Thursday, November 10, 2016

Butter Pecan Ice Cream

Butter Pecan Ice Cream

This ice cream pretty much stole the show when I made this for Thanksgiving last year. It is really really good. Note that the recipe calls for whole eggs rather than the usual egg yolks. Worked totally fine that way.

Butter Pecan Ice cream
Adapted from a recipe available from Epicurious originally published in Gourmet, 2002

2 cups shelled pecans (1/2 lb.), finely chopped (I scaled back to 1 1/2 cups, noting that many Epicurious commenters noted they thought 2 cups was too much and used less)
3 tablespoons unsalted butter, softened (doesn't need to be, as the pecans will be very hot)
1/4 tsp. salt
1 1/2 cups packed light brown sugar
2 tsp. cornstarch
4 large eggs, lightly beaten
2 cups whole milk
2 cups heavy cream
3/4 tsp. vanilla extract

1. Preheat oven to 350 F.

2. Spread pecans on a baking sheet (lined with foil for easy cleanup) and toast in the oven until fragrant and slightly darker, about 7 to 8 minutes (watch the nuts to avoid burning them). Remove nuts from oven, transfer to a bowl (they will be hot). Add butter and salt to hot pecans and toss until butter is melted, then set nuts aside to cool completely.

3. Stir together the brown sugar and cornstarch, then add the eggs and stir until combined (you can try using a whisk for this, since the original recipe says to "whisky" but I think using a spoon or spatula will work much better, as the whisk tends to fling ingredients too easily). Bring milk and cream just to a boil in a 3- to 4-quart heavy saucepan over moderately high heat, (reduce heat to medium-low) then add to egg mixture in a stream, whisking constantly, and transfer custard to saucepan. (rather than add the hot milk to the bowl and transfer back to the pan, I just added the egg mixture to the pan while whisking constantly).

Cook custard over moderately low heat, stirring constantly with a wooden spoon, until thick enough to coat back of spoon and registers 170 to 175°F on an instant-read thermometer, 2 to 3 minutes (do not let boil).

Immediately pour custard through a fine-mesh sieve into a bowl and stir in vanilla, then cool, stirring occasionally. Chill custard, its surface covered with wax paper, until cold, at least 3 hours.
Freeze custard in ice cream maker until almost firm. Stir together ice cream and pecans in a bowl, then transfer to an airtight container and put in freezer to harden.

Thanksgiving Central

Wednesday, November 9, 2016

Fall-Leaf Apple Pie

Fall-Leaf Apple Pie

I've covered apple pies with a plain crust and a lattice, but for this pie I wanted to get more decorative. I've seen pies decorated with cutouts and the idea in Fine Cooking magazine to use overlapping leaves seemed perfect for Thanksgiving, everybody's favorite fall holiday.

The Fine Cooking recipe calls for cutting each leaf by hand, as well as making smaller leaves. I cheated a little bit: I used a leaf-shaped cookie cutter. This worked great, as each leave was the same size--about 3 1/2 inches long by 2 inches wide. I scored a line down the middle of each leaf with sharp knife (do this carefully to prevent cutting all the way through the dough).


When placing the leaves on top of the pie, they should overlap just slightly. If your leaves are cut to the same size as mine, you'll need 24 leaves to complete the top. Start with the outer ring and place 14 leaves flush against the edge of the pie plate. Then, complete the inner ring with 9 leaves. Finish with a final leaf in the center.

Since I've had such good luck with it in the past, I switched up the crust recipe and used my trusty "foolproof" double-pie crust with vodka recipe from America's Test Kitchen.


Fall-Leaf Apple Pie
Adapted from Apple with Leaves recipe in Fine Cooking and Foolproof Pie Dough recipe from America's Test Kitchen

Crust:
12 1/2 oz. all-purpose flour (about 2 1/2 cups)
1 tsp. table salt
2 tbsp. sugar
20 tbsp. cold unsalted butter (2 1/2 sticks), cut into 1/4-inch slices
1/4 cup chilled vodka
1/4 cup very cold water

Pie:
5 to 6 firm, tart apples, peeled, cored and quartered
1/2 cup granulated sugar
2 tbsp. all-purpose flour
3/4 tsp. ground cinnamon
1/4 tsp. ground nutmeg
1/8 tsp. salt
1 to 2 tbsp. unsalted butter, cut into 1/2-inch pieces

1. Combine 1 1/2 cups flour, salt and sugar in a food processor, about two 1-second pulses. Scatter butter over dry mixture and process until the dough starts to collect in uneven clumps, resembling cottage cheese with no uncoated flour, about 15 seconds. Scrape sides of bowl with rubber or silicone spatula and redistribute dough evenly around the blade. Add remaining cup of flour and give 4 to 6 quick pulses until dough is evenly distributed and the mass of dough has been broken up. Empty mixture into bowl.

2. Sprinkle vodka and water over dough mixture. With the spatula, combine the liquid with the dough using a folding motion, pressing down on dough until it sticks together (use your hands a little if needed, but be careful not to overwork the dough). Divide dough into two pieces, roll into balls and flatten slightly to form thick 4-inch discs. Wrap in plastic and chill at least 45 minutes, up to 2 days.

3. To make the pie crust and decorative top: On a lightly floured surface, roll one of the dough discs into a 12-inch round 1/8 inch thick. Fold the dough over the rolling pin, ease it into a 9-inch pie pan, and unfold it so it's centered over the pie plate with edges draped over the sides. Press the dough up the sides and over the rim of the pan, and trim it to leave about an inch of dough beyond the rim of the plate. Fold the edge of the dough under itself so that the crease is flush with the top of the pie plate. Press a fork into the edge of the dough to make vertical lines--this "crimping" process seals the folded dough together. Chill the pie plate with the dough while you cut out the leaves.

4. Combine any scraps from the first disc with the second disc and roll out the dough to 1/8 inch thick. With a paring knife or a leaf cutter, cut out at least 24 leaves 3 1/2 x 2 inches in size. With the paring knife, score a "vein" down the center of each leaf, being careful not to cut all the way through the dough. Place the cut leaves on a floured baking sheet (don't stack them) and set them aside in a cool place.

5. Cut the apples into 1/4-inch slices--there should be about 7 cups. Put the apples in a large bowl and add the sugar, flour, cinnamon, nutmeg, and salt. Toss gently to coat the apples with the flour-sugar-spice mixture. Transfer the apples to the cooled pie shell, tucking in any apples to create a slight dome in the center. Dot the apples with large flecks of the remaining 1 to 2 tbsp. of butter.

6. Starting at the rim of the pie plate, place the leaves at a slight angle and slightly overlapping around the edge of the pie until the leaves go all the way around. Then make a second smaller circle of leaves closer to the middle of the pie--finishing with a final leaf in the middle. Chill the pie in the refrigerator for 15 minutes.

7. Position two racks close together in the lower third of the oven, set a foil-lined baking sheet on the lowest rack to catch any drippings from the pie. Heat the oven to 350 F.

8. Bake the pie on the second-lowest rack until the crust is a deep golden brown all over and the apples are tender when pierced with a thin knife blade, about 60 to 80 minutes (I baked my pie for 85 minutes). Let the pie cool completely before serving.

Thanksgiving Central

Tuesday, November 8, 2016

Butternut Squash, Roasted Tomato and Popped Black Bean Salad

Squash, Roasted Tomato and Popped Black Bean Salad

It's easy to load a Thanksgiving table with carb-heavy dishes like stuffing, mashed potatoes and biscuits. I'm not at all opposed to that, however, I like to balance my table with a few vegetable sides as well. This recipe, which was recently featured in the Washington Post, strikes me as being perfect as a healthy Thanksgiving side. More importantly, it's quite delicious. I've made it twice--loved it both times. There's very little added fat and no added sugar in this dish of primarily roasted squash and cherry tomatoes (good cherry tomatoes are mostly out of season, although I have still seen some recently--if not available, you could just omit them and still have a great dish, or perhaps substitute something like chickpeas). I love the black beans, which take on a slightly crispy texture from being cooked in a dry pan until they crack open. The recipe comes from Anna Jones' A Modern Way to Cook: 150+ Vegetarian Recipes for Quick, Flavor-Packed Meals. Based on this recipe, I'm more than a little intrigued about what other delicious ideas she has.


Butternut Squash, Roasted Tomato and Popped Black Bean Salad
Adapted from A Modern Way to Cook: 150+ Vegetarian Recipes for Quick, Flavor-Packed Meals by Anna Jones, as appeared recently in The Washington Post

Note on deviations from original recipe: I peeled the squash, as I prefer it that way. I added the olive oil spray. The recipe gave the option of using liquefied coconut oil instead of olive oil. The recipe called for freshly ground seeds from 2 green cardamom pods, whereas I just used already ground cardamom. The recipe gave the option of using coconut yogurt instead of plain. Also, I used more yogurt--an entire single-serving container.

1 butternut squash (about 2 pounds total), peeled
Olive oil spray
2 tbsp. plus 1 tbsp. extra-virgin olive oil
Salt, to taste
Freshly ground black pepper, to taste
1 tsp. plus 1 tsp. ground cardamom
1 3/4 oz. (a generous 1/2 cup) flaked unsweetened coconut
25-30 golden or red cherry tomatoes, cut in half
1/2-inch piece peeled fresh ginger root, finely grated (such as with a Microplane)
14 oz. can of black beans, drained and rinsed
5.3 oz. (single-serving container) nonfat plain Greek yogurt 
Finely grated zest and juice of 1 lime

1. Position oven racks in the upper and lower thirds of the oven and preheat to 475 F.

2. Line two baking sheets with aluminum foil and spray with olive oil spray. Cut off the ends of the squash, then cut it half lengthwise. Scoop out and discard the seeds (I recently discovered that an ice cream scoop is the perfect tool for this). Cut the squash halves into 1/2-inch-thick slices and arrange them on the two prepared baking sheets. Drizzle the squash slices with 2 tbsp. of olive oil and sprinkle lightly with salt, pepper and 1 tsp. of ground cardamom. Roast the squash for 25 to 35, minutes until blistered and golden, rotating the baking sheets top to bottom and front to back after the first 15 minutes. Spread the toasted coconut over the squash and return the baking sheets to the oven for an additional 5 minutes or so until the coconut is lightly toasted. Remove from oven and set aside. If you only have one oven, keep it on for step 3 (if you have two ovens, you can do step 3 concurrently with step 2).

3. In a medium bowl, add the cut cherry tomatoes with remaining tablespoon of olive oil, salt and pepper, to taste, and grated ginger and toss to coat the tomatoes. Spread the cherry tomatoes onto another baking sheet (lined with aluminum foil for easy cleanup) and arrange them all cut-side up. Roast in the oven for about 20 minutes until the tomatoes look a bit deflated. Remove from oven.

4. While the vegetables roast, dry the drained/rinsed black beans on paper towels. Heat a nonstick skillet or saucepan (I used a shallow 3 1/2 qt. saucepan) over medium heat. Add the beans and cook for about 12-15 minutes, stirring occasionally until the beans have dried out, cracked open and crisped.

5. In a small bowl, add the yogurt, lime zest, lime juice, remaining tsp. of cardamom and salt and pepper to taste and stir to combine.

6. Serve the salad on a platter as follows: spread the beans first in a single layer, top with roasted squash slices, then the tomatoes and drizzle the yogurt on top.

Thanksgiving Central

Monday, November 7, 2016

Restaurant: All-Purpose (Washington, D.C.)

Buona pizza
It's hard to believe there was a time--not too long ago--when 2 Amys was viewed as the only serious pizza game in town. My how things have changed.

Today, Washingtonians have an almost embarrassing selection of riches when it comes to finding good pizza. Comet Ping-Pong, which celebrated its 10th anniversary last weekend, perfected the casual vibe of a neighborhood pizzeria with decidedly fine quality wood-fired-oven pizzas. Wiseguy NY Pizza satisfied that craving for New York-style pizza without going to The Big Apple. And the 14th Street crowd are in good hands with the pies from Etto, a 2 Amys offshoot, and Ghibellina. I've enjoyed quite good pizza at Ardeo, Arcuri, Graffito and Vace. Almost every style of pizza is well-covered here, save for good Chicago-style pizza, which is MIA since the closure of Armand's Tenleytown a few years ago (and yes, I'm aware of District of Pi--the less said, the better). A few other places I haven't visited, such as Il Canale and Menomalé, also draw rave reviews. And while it's not exactly "gourmet," an Adams-Morgan Jumbo Slice certainly hits the spot in the wee hours of the morning after a night of bar-hopping.

Against this backdrop of seemingly endless choices for crust, sauce, cheese and toppings, I was skeptical when I heard that D.C. was getting yet another pizzeria with All-Purpose. Sure, it was opening in Shaw, the city's white-hot restaurant neighborhood, with a prime slot near 9th & N, a geographic focal point of the D.C. new food boom.

That skepticism quickly vanished after my first visit to the handsome and inviting establishment.

Sleepy Hollow pizza
My first trip to All-Purpose was at lunch, just days after Washington Post restaurant critic Tom Sietsema named the restaurant his favorite in the city for his annual Fall Dining Guide. I arrived early, expecting it to be busy, but was actually surprised by how sparsely packed the dining room was (note to All-Purpose fans: weekday lunch appears to be a good time to get a table here. Second note to All-Purpose fans, unlike other hot D.C. restaurants, they take reservations! Yay!). With the piling accolades, I was expecting something fancy, but All-Purpose has a very casual, laid-back vibe, with bare wood tables, wood paneling and tile flooring (all those hard surfaces, while lovely, do make for a pretty noisy restaurant when it is busy).

All-Purpose's warmth doesn't stop at the decor. The staff is quite friendly too. Both during my lunch and dinner visits, I encountered friendly hosts, managers and servers, the last of which were efficient, attentive and prepared to answer questions. I even got to chat with one of the cooks who came out of the kitchen to tell me how they make their dough (more on that later).

Starting the evening with a cocktail isn't a bad idea. All-Purpose's drinks list includes a short menu of classic cocktails like a Black Manhattan, an Italian spin on the whiskey classic that substitutes Averna for sweet vermouth. There's also a short list of European and American wines by the glass, a longer list of beers and a quite long list of wines by the bottle.

And the pizza? It's divine. Absolutely among the best pizza I've had in D.C. or anywhere. During my first visit I ordered the Buona, quite possibly the best pepperoni pizza I've had in my life. It's insanely good. Simple too: large slices of pepperoni, chili-honey (basically lightly spicy honey) and fresh basil top a traditional base of mozzarella and tomato sauce. I'm getting hungry writing about it. It was so good that when Chris and I went for dinner a couple weeks later, I insisted he try it too. We also got the Sleepy Hollow, a seasonally delicious mixture of roasted Brussels sprouts, pancetta, smoked mozzarella, onion and tomato sauce. As much as I loved the Buona, it would be hard to say I preferred it over the equally masterful Sleepy Hollow.
All-Purpose Caesar Salad
Caesar Salad
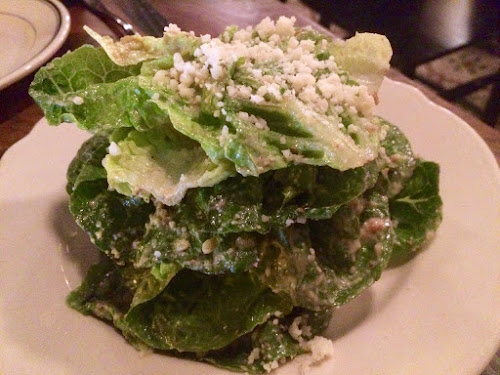
All-Purpose pizzas come in an individual size, so ordering several and sharing (or if you must, one for yourself) works great. Although pizza is clearly the focus here, All-Purpose offers a few other entrees, including a lasagna, and quite a few small plates. At lunch, there are also some sandwiches. During dinner, we started the evening with a fresh-tasting Caesar salad, which arrives as a stack of little gem lettuce leaves coated with a nicely acidic anchovy dressing, parmesan and breadcrumbs (quite small, so don't expect croutons). If you like the Caesar, it also shows up at lunch as the Cape May pizza, which I haven't had but hear is another standout.

Now let's talk about that pizza crust. You know how sometimes you eat pizza and skip eating the final arc-shaped piece of crust without toppings? (Yes, I know this practice is anathema to many of you, but some employ it as a way of portion-control.) Well, you won't want to do that here, because the crust is absolutely delicious. This is where chef Mike Friedman has gotten quite inventive. All-Purpose uses a blend of flours that includes whole-wheat flour--unusual, since most pizza just uses all-purpose flour (sort of ironic, given their name). It also incorporates malt powder, which gives the yeast an additional source of fuel while also providing caramelization for the crust when it bakes. Then, the dough is aged for 3 days, allowing for significant fermentation. The pizzas are baked in a deck oven, rather than the trendy wood-fired oven.

If you're hankering for dessert, All-Purpose has a partnership with Tiffany MacIsaac's next-door bakery, Buttercream, an inspired establishment in its own right. Although the cakes sound amazing, we split a delicious dish of peanut-butter soft-serve ice cream with caramel sauce and cookie crumbles (the menu said it had a concord grape element too, although I couldn't discern that by taste). If you're thinking of skipping dessert, at least stop next door and pick up a few of Buttercream's wonderful cookies for later. You won't regret it, nor will you regret giving this gem of a pizza restaurant a chance.

All Purpose, 1250 9th Street NW (near M Street across from the Walter E. Washington Convention Center). (202) 849-6174. Reservations: Resy.

Thursday, November 3, 2016

Thanksgiving Stuffing Recipes

Thanksgiving Stuffing Recipes

Is it "stuffing" or "dressing"? technically the latter is the correct term if it's cooked outside the bird; however, since "dressing" is so closely associated with salad dressing, I just prefer to call it all stuffing. Regardless of where it's cooked--and I recommend outside the bird for food safety reasons--it's one of Thanksgiving's most delicious and versatile dishes.

The foundation of a good stuffing is sautéed aromatic vegetables (usually onion and often celery), dry bread (of course), maybe some protein such as sausage or bacon and liquid, usually a stock. After that, you've got a lot of room to build in the flavors you really like. I love to experiment with stuffing, as shown by the mix of recipes below.

Classic 11-Ingredient Stuffing. Here's a good place to start if you've never made stuffing from scratch before. The only way to make stuffing easier is to go the boxed route (which I don't recommend). Fresh sage and dried thyme flavor this simple mixture of onion, celery and sourdough bread cubes.

Sausage Cornbread Stuffing. This is my favorite traditional stuffing--basically my go-to almost every Thanksgiving. It's similar to the Classic 11-Ingredient Stuffing except made with cornbread, although I like to mix it up with dried cranberries sometimes.


Cornbread Stuffing with Sausage and Fennel (pictured above). Another cornbread stuffing variation--this one I found in Bon Appétit magazine. In addition to the fennel, scallions, pear, marjoram and white wine make this an interesting and flavorful stuffing.

Rye Bread Stuffing. I usually make stuffing with some kind of white bread, if I'm not using cornbread, but with this recipe I decided to see what rye bread would be like. There's bacon and apple in this one too.

Italian Stuffing. I told you there were a lot of possibilities for variation with stuffings. This one looks to Italy with Italian bread, pine nuts, pancetta, fennel and dried figs.

Southwestern Cornbread Stuffing

Southwestern Cornbread Stuffing (pictured above). Stuffing is usually pretty mild, but with this version I gave it a spicy kick with chorizo and chipotles in adobe. Don't forget to include the pepitas (pumpkin seeds) in this stuffing.

Oregon Stuffing. Wanting something that nods to my childhood state, this one includes sourdough, hazelnuts, apple, dried blueberries and Oregon beer.

Asian Grain Stuffing. Not into bread? Use whole grains instead. Here, brown rice mixes with sausage, onion, celery, carrot, shiitakes, ginger, soy sauce, rice vinegar and red chili pepper flakes for a dish with subtle Asian flavor.

Thanksgiving Central

Wednesday, November 2, 2016

Thanksgiving Breads Recipes

Butter flaky biscuits


It's not Thanksgiving without biscuits at our house. Sure, it may seem redundant to have yet another carb when there are already plenty of others on offer.

I'm a big fan of quick breads for Thanksgiving and biscuits in particular. Drop biscuits, like the Cranberry-Walnut Drop Biscuits I shared yesterday make a great choice, since you mix the ingredients together, plop them onto a baking sheet and stick them in a hot oven. Very simple.

Biscuits that are rolled out and cut are a little more work, but offer a more uniform look and a really nice texture. The Butter-Flaky Biscuits pictured at top are one of my favorites. The buttery dough is rolled out and folded several times, creating layers of buttery goodness. Rosemary, Onion and Black Pepper Biscuits pack a lot of bold flavors into a savory biscuit. Similarly, I love Cheesy Scallion-Corn Biscuits, especially with a Homemade Compound Butter spiked with fresh chives.


For something with a bit of smoke and sweetness, I recommend Butternut Squash, Pecan and Bacon Bread (pictured above), which comes together quickly if you roast the squash in advance. Lastly, although I usually make cornbread to cube into stuffing, Simple Cornbread is pretty amazing on its own as well.

Thanksgiving Central
SaveSave

Tuesday, November 1, 2016

Cranberry-Walnut Drop Biscuits

Cranberry-Walnut Drop Biscuits

Welcome to Thanksgiving recipe month! If there's a loose theme to this month's recipes, it's adaptability: how to take other recipes and tweak them in small but smart ways to make them something different. Adapting recipes is one of the easiest ways to be creative in the kitchen. You're not inventing something from scratch--probably fruitless anyway unless your exploring the outer reaches of gastronomy. Chances are your "invention" has already been done by someone else. Instead, why not start with an established recipe and give it your own spin (with due credit to the originators, of course)?

I adapted this recipe for these wonderful biscuits from Serious Eats' Quick and Easy Drop Biscuits Recipe. When making this, I accidentally added 1 3/4 cups of milk instead of 3/4 cup. As I was stirring the dough, I thought "wow, this is really soupy for biscuit dough." When I realized the mistake, the best way to solve the problem: double the recipe. I cut it back down to size for the recipe below.

Cranberry-Walnut Drop Biscuits

Cranberry-Walnut Drop Biscuits
Adapted from a recipe by Marissa Sertich Velie for Serious Eats

4 oz. (1 stick) cold unsalted butter, cut into 1/4-inch pieces and refrigerated
8 oz. (1 1/2 cups) all-purpose flour
2 tsp. baking powder
1 tsp. kosher salt
3/4 cup whole milk
½ cup walnuts, chopped
½ cup dried cranberries

1. Preheat oven to 400 F. Line a baking sheet with parchment paper.

2. In a large bowl, whisk together the flour, baking powder, and salt. Add the butter and toss with the dry ingredients until coated with the flour mixture. Use your fingers (or a pastry blender) to rub (or cut) the butter into the flour mixture until the mixture has a coarse sandy texture.

3. Add the milk, walnuts and dried cranberries and stir the mixture with a fork until it just comes together into a slightly sticky dough.

4. Using a 1/4-cup measuring cup, mound balls of dough onto the prepared baking sheet, leaving about 2 inches between the mounds. Bake the biscuits until golden brown, about 18-20 minutes. Let biscuits cool slightly, then transfer them to a wire rack.

Thanksgiving Central