Thursday, October 17, 2013

Dashi-Poached Salmon


I've been reading a lot about dashi lately, the Japanese broth that is the base of a lot of other dishes, like miso soup and certain types of ramen. You can also use it for braising or poaching, which is how I cooked this salmon.

bonita flakes and kombu
Bonita flakes and kombu are the key ingredients in dashi.
Although dashi has a mild flavor, its important property is that it enhances savory (i.e. "umami") flavors since it is high in glutamates. It's very simple: steep a piece of dried seaweed (kombu) in nearly boiling water, then add dried fish (bonito flakes), steep and strain. The resulting broth is lightly colored with a bit of sea flavor from the kombu and smoke from the bonito, which actually smells a bit like bacon.

Making dashi

In looking to see what others have gone, I found surprisingly few recipes for salmon braised in dashi. I really liked Myra Kornfeld's recipe, which also includes ginger, soy sauce and sugar. I topped the salmon with fresh chives and served it with corn on the cob--the last for the year from my neighborhood farmers market.

Poaching salmon in dashi with soy sauce, ginger and sesame seeds.


Dashi-Poached Salmon
Adapted from Braised Salmon in Dashi by Myra Kornfeld

2 cups dashi (see recipe below)
2 tbsp. soy sauce (may use low-sodium)
1 tbsp. sugar
2 tsp. minced fresh ginger
2 tsp. toasted sesame oil (sadly, I was out of this when I made this, so I tossed a handful of sesame seeds into the mix)
3/4 lb. salmon fillet
2 tbsp. chopped fresh chives

Add dashi to a medium skillet or frying pan with a lid. Bring to a gentle boil. Whisk in the soy sauce, sugar, ginger and sesame oil. Add salmon, skin-side down, cover pan and reduce heat to medium-low to simmer. Cook for about 5 to 10 minutes depending on the thickness of the salmon and how done you like it. Remove salmon from pan, cut off skin and serve topped with a sprinkle of fresh chives.

Dashi
Finished dashi.

Dashi

Makes 2 cups (multiply recipe as needed)

2 cups of water
1 piece of kombu, about 6-8 inches long
1/4 cup bonita flakes

Add 2 cups of water and kombu to a medium saucepan and soak for 15-20 minutes. Turn on the heat to medium-high and heat until the water is almost boiling (bubbles are just starting to break on the water's surface). Remove from heat and add the bonita flakes. After about 3-4 minutes, strain out the kombu and bonita, leaving the broth. Refrigerate until ready to use, up to 1 week.

Tuesday, October 15, 2013

Caramel Chicken


This recipe, from the latest issue of Bon Appétit, is how I discovered the amazing rice I wrote about yesterday. This dish is also very good: like the best homemade version of General Tso's Chicken you've ever had. Except not deep-fried.

Although not in the original recipe, I recommend spiking it a bit with a pinch of red chili pepper flakes if you want a little heat.

Caramel Chicken
Adapted from Bon Appétit

2 tbsp. vegetable oil
2 lbs. boneless, skinless chicken thighs (I substituted this from the recipe's original bone-in, skin-on chicken thighs)
Salt, to taste
8 garlic cloves, peeled
1/3 cup (packed) light brown sugar
1/4 cup unseasoned rice vinegar
Pinch of red chili pepper flakes (optional, if you want the heat)
2 tsp. minced fresh ginger
1 cup low-sodium chicken broth
1/4 cup low-sodium soy sauce
2 scallions, thinly sliced
Cooked white rice (for serving, see Bon Appetit's incredible rice recipe I discussed yesterday)

1. Heat oil in a large pot (such as an enamel-coated Dutch oven) over medium-high heat. Pat chicken pieces dry with a paper towel, season with salt and, working in two batches, cook in the oil until golden brown and crisp, about 6 to 8 minutes per side. Transfer partially cooked chicken to a plate (it will finish cooking later).

2. Add garlic to pot and cook, stirring frequently, until golden, less than 2 minutes. Transfer to the plate with the chicken. Remove excess fat from the pat.

3. Add 1/2 cup water to pot and use a wooden spoon to scrape browned bits from the bottom of the pot. Add brown sugar and stir to dissolve. Cook mixture, stirring frequently, until it thickens and turns a deep amber color (Bon Appétit's recipe said this would take about 4 minutes, but it took me a lot longer--like 10 to 15. I recommend watching it carefully, since it could burn easily once it thickens).

4. Stir in the vinegar (it may sputter a bit) and continue stirring to dissolve any sugar the vinegar may re-crystallize. If using red chili pepper flakes, add those now. Stir in the ginger, broth and soy sauce.

5. Return chicken to the pot, increase heat to bring mixture to a boil, then reduce heat and simmer gently until the chicken is fully cooked, about 20 minutes. Transfer chicken to a plate.

6. Bring cooking liquid to a boil and cook until thickened, about 10 minutes. Return chicken to pot and stir to coat with the sauce. Serve chicken over cooked rice and topped with fresh chopped scallions.

Monday, October 14, 2013

Perfect White Rice


Do you ever find a recipe for something simple that just blows your mind because it's done so well? That how I feel about the Perfect Pot of Rice recipe from Bon Appétit, which is hands down the best technique I've ever used for making rice at home without a rice cooker. It's another great example of how the conventional wisdom isn't always right.

So let's talk about that conventional wisdom: Most recipes for boiling rice will tell you to employ a 2-to-1 ratio of water to rice, so, typically, you might use 2 cups of water for 1 cup of dried rice, resulting in about 3 cups of cooked rice. For flavor, you might add a little butter, salt or both. Bring the mixture to a boil, cover, reduce heat to lower and cook on a low simmer for about 25 minutes. Uncover and fluff with a fork.

The results are fine, but never really great. There's usually a little moisture left in the bottom of the pot. The grains are cooked but a little soggy. It works fine as a base for a stir-fry, but it's not something you'd probably want to sit there and eat by itself.

This rice I could eat all day. The texture was perfect. Toothy, like al dente pasta, but definitely cooked through. Not at all soggy. Not "sticky" like Chinese rice either. It was really quite impressive.

Perfect White Rice
Adapted from a recipe by Bon Appétit

1 cup long-grain white rice
1/2 tsp. salt
1 1/4 cups water

1. Add ingredients in a 2-3 quart heavy saucepan that has a tight-fitting lid and swirl to combine (do not stir). Turn on the heat and bring to a boil. Cover pot, reduce heat to low and cook for 18 minutes (do not remove lid during this time).

2. Remove from heat. Uncover and place a clean kitchen towel over the the pan then recover (so the towel acts as a barrier between the lid and the rice in the pot). Let rice stand covered like this for 10 to 15 minutes. Remove lid and towel and fluff rice with a fork. Serve immediately or refrigerate for later.

Friday, October 11, 2013

Pumpkin Cocktails

Pumpkin sazerac

Here's a strange but true fact about pumpkin drinks: a lot of them contain no actual pumpkin. Rachael Ray's Pumpkin Pie Martini? No pumpkin.

This isn't true of just cocktails. Starbucks' pumpkin spice latte, for example, contains the spices common to pumpkin pie (cinnamon, nutmeg and clove), but no actual pumpkin, a fact that dazzled the Daily Mail recently, but which has been pretty well-known for a long time.

For these cocktails, I made a syrup with pumpkin puree and traditional pumpkin pie spices: cinnamon, ginger, allspice, nutmeg and clove.

The pumpkin flavor is subtle but apparent in both drinks. The first is a riff on the classic Sazerac, a drink traditionally not served on the rocks (but I'll admit to throwing in a couple rocks, since otherwise it's rather potent), and the second a refreshing gin drink with apple brandy.


Pumpkin Sazerac

I leaned on Jeffrey Morgenthaler's great piece on the proper technique for making a Sazerac.

Absinthe, scant amount
2 oz. rye whiskey (I used Knob Creek)
1/2 oz. pumpkin pie syrup (see recipe below)
3 dashes Peychaud's bitters
1 dash Angostura bitters
Lemon peel

Add a little bit of absinthe to an empty rocks glass, swirl the liquid around and dump it out. In a separate mixing glass filled with ice, add whiskey, syrup and bitters. Stir until well chilled. Strain mixture into the rocks glass. Twist the lemon peel over the glass to express its oils into the drink; discard peel.


Pumpkin-Apple Sparkler

1 oz. American gin (I used Green Hat gin)
1/2 oz. apple brandy (I used Laird's Straight Apple Brandy)
1 oz. pumpkin pie syrup (see recipe below)
1 oz. fresh lemon juice (juice from 1/2 lemon)
Dash of Angostura bitters
2 oz. club soda

Combine gin, apple brandy, pumpkin syrup, lemon juice and angostura bitters in a shaker with ice. Shake until cold. Pour into a highball glass with ice. Top with club soda and stir to combine.


Pumpkin Pie Syrup

1 cup water
1 cup sugar
1 cup canned pumpkin puree
1 tsp. ground cinnamon
1 tsp. ground ginger
Dash of ground nutmeg
Pinch of ground clove
Pinch of ground allspice

1. Combine all ingredients in a saucepan and bring to a boil, stirring until the sugar has dissolved (it's kind of hard to tell that it's dissolved since the puree makes the mixture cloudy, but after a couple minutes, it will be dissolved). Remove from heat and set aside to cool for about 15 to 20 minutes.

2. Set a fine-mesh strainer over a bowl or glass measuring cup and transfer the cooled mixture to the strainer. Resist the temptation to speed it up with a spatula, since that will force puree through the seive. You should get about 3/4 cup of syrup. Transfer to a sealable container and keep in the fridge.

Thursday, October 10, 2013

Watercress and Fig Autumn Salad


Fall is definitely here now. There's a nice crispness in the morning air again. If we want to eat dinner on our balcony, we have to get out there pretty early. Jackets are starting to come out. Then it will be coats, hats, gloves. You know the drill.

But for now we have fall and with it comes fresh figs. Available year-round in their dried form, there's something much more satisfying about the fleshy sweet fresh kind.

To contrast their sweetness, I paired the figs with floral, peppering watercress; crisp, sharp radishes and some toasted walnuts. A simple balsamic vinaigrette pulls it all together.

Watercress and Fig Autumn Salad

Makes 2 dinner portions

1/3 cup walnut pieces
3 oz. watercress leaves, large clumps torn apart
4 radishes, thinly sliced
1 carrot, peeled and cut julienne
1 oz. prosciutto, cut into narrow strips
3 oz. goat cheese, cut into cubes
2-3 tbsp. chopped fresh Italian (flat-leaf) parsley
2 tsp. good-quality balsamic vinegar
1 tsp. Dijon mustard
2 tbsp. extra-virgin olive oil
Freshly ground black pepper
6 fresh figs, quartered

1. Heat a small frying pan over medium-low heat. Toast walnuts until fragrant, about 7-8 minutes. Set aside to cool.

2. In a large bowl, combine watercress, radishes, carrot, prosciutto, goat cheese and parsley. Whisk together balsamic vinegar and mustard, then whisk in the olive oil. Pour dressing over salad and toss to combine. Season with freshly ground black pepper. Serve in shallow bowls topped with fresh figs.

Wednesday, October 9, 2013

The Feed: October 9, 2013


The Feed is my weekly round up of interesting food-related stories from newspapers, magazines, blogs and websites.

New York Times “A Good Appetite: Spreading Culture - Making Cultured Butter at Home,” by Melissa Clark.
European butter is all the rage in baking these days, often attributed to its higher fat content. But it has a different flavor too—tangier than American sweet-cream butter. Clark explains the reason, which involves culturing the cream before churning it, which isn’t typically done in the United States. She explains how this affects flavor, offers a recipe for DIY cultured butter and includes a fun video of her and others tasting a selection of 13 cultured butters, including her own homemade version.

Washington Post: “‘Cooking slow' offers convenience, in fact,” by Bonnie S. Benwick.
Perhaps because the government shutdown has given me more time to cook lately, I’m more interested in recipes that take longer (which are still great for the weekends under normal circumstances). In reviewing Andrew Schloss’s new cookbook, Cooking Slow: Recipes for Slowing Down and Cooking More, Benwick points out that slow recipes aren’t necessarily more work. She cites a chicken wings recipe that actually has very little “active” cooking time. Also, the recipes just sound really great, like the hanger steak Benwick says becomes “a succulent masterpiece that makes its own demi-glace as it cooks.” I’d definitely eat that.

Food Republic: “Reinventing The Pancake: Mac Cakes Recipe,” by Allison Arevalo and Erin Wade. 
Mac & cheese lovers should really make a point of visiting Homeroom in Oakland, California, a great little restaurant with a menu that features a selection of takes on the pasta and cheese classic. Its owners have now put out The Mac + Cheese Cookbook, which includes this unusual (but amazing-sounding) recipe for a mac & cheese pancake. Cool.

NPR: “Is It Time To Cool It On Kale Already?,” by Maria Godoy and Eliza Barclay.
If you’re getting tired of kale, the green du jour for the last 2 years, you’re not alone. On the event of last week’s National Kale Day, Godoy and Barclay examine how some are going overboard in recommending kale-rich diets to the detriment of other foods. It’s an important reminder that balance is more essential to good health than a focus on one, or even a few, so-called “superfoods.”

Wall Street Journal: “Kale Salad With Toasted Almonds and Pecorino Romano,” by Kitty Greenwald
However…If you’re not tired of kale yet, dive into this great kale salad, adapted from Los Angeles chef David Myer’s dish served at Hinoki & the Bird. I like that includes both raw kale and crispy kale chips.

San Francisco Chronicle: “Chefs take on the summer-to-fall challenge,” by Amanda Gold. 
Bay Area chefs talk about how the change in seasons from summer to fall is influencing their cooking, including dishes that can be served warm or cold depending on the weather. The story includes recipes for several of the dishes discussed.

GQ: “How to Beat an Overpriced Wine List,” by Alan Richman.
Even if you feel pretty confident with restaurant menus, their wine lists can still be intimidating. So many unusual varietals, wineries you haven’t heard of and prices you probably don’t want to pay unless you’re sure you’re getting something good. And even then, you know you’re paying a big mark up. Richman offers a number of tips for successfully navigating the wine list with confidence.

New York Times: “The 12 Best Restaurants in New York for Wine,” by Pete Wells.
If Richman’s piece inspires you to dive into an interesting wine list, Wells’ story offers a great selection of some of New York’s best examples, with tips for finding value and unusual bottles among them.

Los Angeles Times: “For beer lovers, now's the time to appreciate the freshest hops,” by John Verive.
It’s time for the hop harvest, which means the seasonal release of “fresh-hop” brews. Verive explains what they are, along with some other useful hop terminology. I’m definitely going to be looking for some of these beers, like Deschutes Brewery’s Chasin’ Freshies and Hop Trip.

Food 52: “5 Handy Facts About Baking with Parchment Paper,” by Alice Medrich.
If you haven’t yet discovered why parchment paper is an essential baking tool, Medrich shares a few reasons why you should really stock this in your pantry.

Reuters: “Just what is in that chicken nugget?,” by Kathryn Doyle.
The answer’s not as bad as you might think, although it’s really not that great either.

Food & Wine: “95 Ways to Amp Up Thanksgiving” (November issue)
The content doesn’t appear on the site yet, but The November issue of Food & Wine is already out and focuses on Thanksgiving with some pretty amazing-sounding recipes: galette starters, spinach spoon bread, apple-brined turkey and lemon-cranberry pie bars, to name just a few of the mouth-watering options.

Note: The Feed will be taking the week off on October 16. 

Tuesday, October 8, 2013

Stuffed Acorn Squash

Stuffed acorn squash

Last year, I tested a stuffed squash recipe and I was so unhappy with it that I never bothered writing about it. Now that I have a great recipe to share, I'm ready to talk about why it failed.

My previous attempt involved delicata squash stuffed with a mixture of onions, nuts, herbs and cheese. In concept, it was a beautiful recipe. In practice, it didn't quite work, in ways similar to why roasted stuffed turkey doesn't always work.

Acorn squash for stuffing

A baked stuffed squash is going to be tricky because you're combining two concepts that may require different cooking times. This is the same problem with a stuffed turkey--to be sure the stuffing is thoroughly cooked, you risk over-cooking the turkey. With a stuffed squash, since the filling is mostly already cooked, you risk overcooking the filling to ensure the squash is done (or undercooking the squash to ensure the filling doesn't burn). It's catch-22 unless you can get it just right.

Acorn squash
Arrange the squash in microwave-safe bowl as shown for cooking.

My results were a compromise between these two extremes, which means that neither the squash nor the filling was satisfying as I'd wanted: the squash, slightly undercooked, was too hard and the filling, slightly overcooked, a bit dry. There had to be a better way.

Microwave acorn squash
The squash came out of the microwave looking like this: thoroughly tender and slightly browned.

This stuffed acorn squash recipe addresses that problem beautifully: don't attempt to bake the squash stuffed. Problem solved! Here, the squash is cooked separately and the two halves are joined at the end. Does the dish suffer from this? Not at all. The resulting stuffed squash was beautiful and flavorful, with both the vegetable and its filling cooked just right.
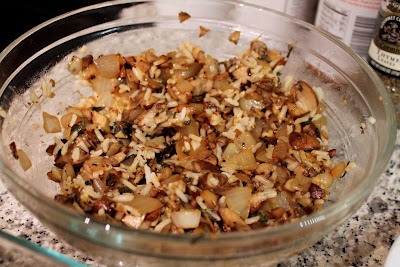
Filling for acorn squash
This basic onion, mushroom and rice filling can be adapted as you please, perhaps some chopped nuts (hazelnuts? pecans?) a different cheese (parmigiano-reggiano?) or herbs (parsley?).

I hit on this idea from Martha Stewart's stuffed squash recipe. Her recipe finishes the dish under a broiler to melt its cheese topping. I incorporated the cheese into the filling, so this last step was not necessary. I also did not roast the squash. Instead, as recommended by America's Test Kitchen, I cooked it in the microwave, which was really easy and saved time.

Mushroom, rice and onion stuffed acorn squash

Stuffed Acorn Squash
Adapted in part from Acorn Squash Stuffed with Mushrooms and Rice by Martha Stewart

2 acorn squash, cooked in the microwave (see recipe below)
1 or 2 tbsp. extra-virgin olive oil
1 medium yellow onion, minced
8 oz. cremini onions, stemmed and finely chopped
Salt, to taste
1/2 tsp. dried thyme
2 tbsp. chopped fresh sage
Freshly ground black pepper
1/2 cup cooked white rice
1 oz. finely grated aged gouda cheese

1. Heat olive oil in a medium (10-inch) frying pan over medium heat. When hot, add onion and mushrooms, season with salt and thyme, and sauté until softened, about 8 minutes. Stir in the chopped sage and continue cooking until lightly browned, a few minutes more. Transfer mixture to a large bowl and immediately add freshly ground black pepper, cooked rice and grated cheese (the residual heat will melt the cheese as it's mixed in).

2. Place the cooked squash cut-side up on a serving plate. With a large spoon, fill the cavity of each squash half, pressing down gently to compact filling. Slightly mound filling for each (there should be just enough filling for the four halves). Serve immediately.


Simply Cooked Acorn Squash
Adapted from Acorn Squash with Brown Sugar by America's Test Kitchen

Note: Because I was stuffing the squash, I did not follow the final step of broiling the squash with butter and brown sugar.

2 acorn squash, halved and seeded, with bottoms sliced off so they sit upright if necessary
Salt, to taste
1/4 cup water

1. Sprinkle cut sides of squash with salt. Place cut-side down in a microwave-safe bowl so that the cut sides face out (as shown in the photo above). Add water to bowl. Cover bowl tightly with plastic wrap. Poke 4 steam vents into the top of the plastic.

2. Microwave on high until the squash is very tender, 15 to 25 minutes (mine was nicely done in 20). Remove from microwave (careful, the bowl will be very hot). Allow to cool slightly, then carefully remove plastic wrap.

*If you want to serve the squash by itself, here are the additional steps America's Test Kitchen included for serving with butter and brown sugar. Note that I did not test this preparation but am providing FYI.

3 tbsp. unsalted butter
2 tbsp. dark brown sugar
1/8 tsp. salt

Adjust oven rack to uppermost position (about 6 inches from heating element) and preheat broiler. Melt butter, sugar and salt in a small saucepan over low heat until combined, whisking occasionally.

Transfer cooked squash cut-side up to a rimmed baking sheet. Spoon the butter/sugar mixture onto each squash half. Broil squash until brown and caramelized, about 5 to 8 minutes, rotating baking sheet as needed. Remove squash when done and serve immediately.